Applications

Applications

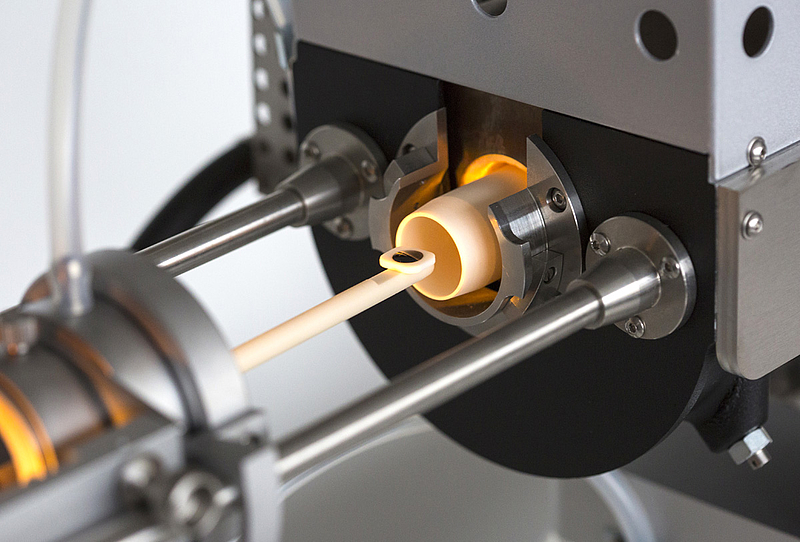
Heating microscopes from Hesse Instruments and modernised Leitz/Leica instruments with the EMI III heating microscope software are used for the thermo-optical analysis of materials at temperatures of up to 1600°C. The heating microscope’s open and modular construction paves the way for a wide range of possible applications.

Analyses and areas of application

In the Hesse Instruments and Leitz/Leica heating microscopes, materials can be heated to temperatures above their melting point. In the process, non-contact measurements are taken in order to obtain information about the following material properties:

  • sintering characteristics
  • softening characteristics
  • melting characteristics wetting characteristics
  • thermal expansion characteristics.
  • Benetzungsverhaltens

Heating microscopes are used for tasks ranging from research and development applications to the optimisation of processes and quality control. The area of quality control generally uses standardised measurement methods for the purpose of material analysis. Furthermore, the heating microscope’s open and modular construction means that measurement methods aimed at process optimisation can be adapted to real processes or to research and development questions
Conformity with standards, materials, and sectors of industry

Heating microscopes were originally developed for analysing the melting characteristics of ashes in accordance with standards. Instruments from Hesse Instruments and Leitz/Leica conform to the following standards:

  • DIN 51730:2007
  • ISO 540:2008-06
  • CEN/TS 15370-1:2006 und CEN/TR 15404:2006
  • the Hesse Instruments method, which is based on DIN 51730:1984.

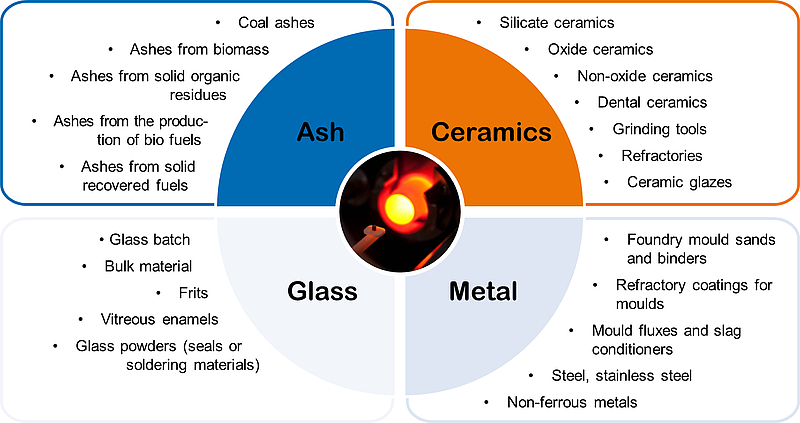
In addition, the heating microscope serves as a reliable instrument for the analysis of ceramic materials, glasses, casting powders and a range of other materials and is therefore used in various sectors of industry.

In principle, you can use the heating microscope to analyse all materials that meet the following conditions:

  • They are not explosive or combustible.
  • They do not contaminate the measuring cell due to unusual wetting or corrosion characteristics or evaporating constituents.
  • There is no risk to operators due to evaporating constituents.
Example Applications

The heating microscope’s combination of measurable materials, tasks, analytical methods and measuring parameters paves the way for a wide range of applications. We have collected a few example applications of the heating microscope for you in the form of application reports.

Click on the link to each report for an overview. You can then simply request the full report from us if necessary.

Please do not hesitate to contact us if you are interested in a material or a measurement method that is not included in the examples.

  • Materials characterisation
  • Instrument characteristics
  • Influence of instrument parameters on the measurement result

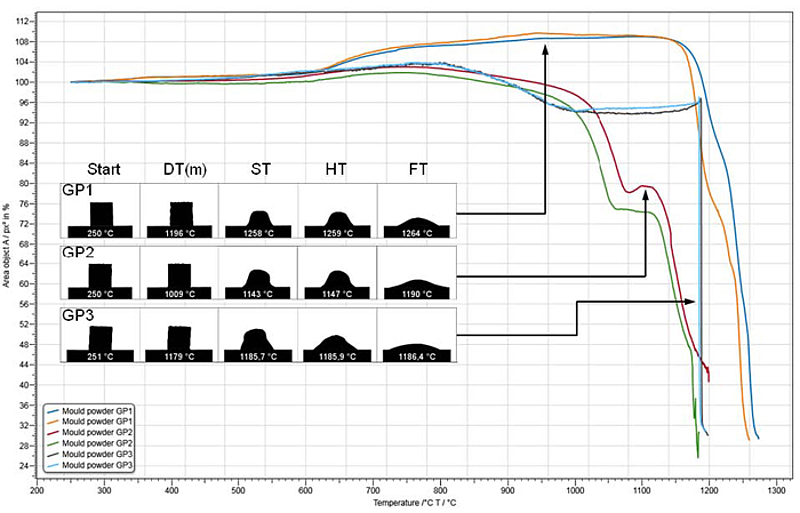
Softening and melting characteristics of casting powders

Casting powders are added to the molten steel during steel production. Among other things, they act as a release agent between the molten steel and mould wall and protect against reoxidation of the melt.

The softening and melting characteristics are important for process control and are analysed both as part of the development of new casting powders and in quality control during and after production.

Heating microscopy has proven its worth for the characterisation of casting powders even if this analytical method is not defined in standards.

In this report, you will find three examples of the characterisation and comparison of the melting characteristics of casting powders from different manufacturers.

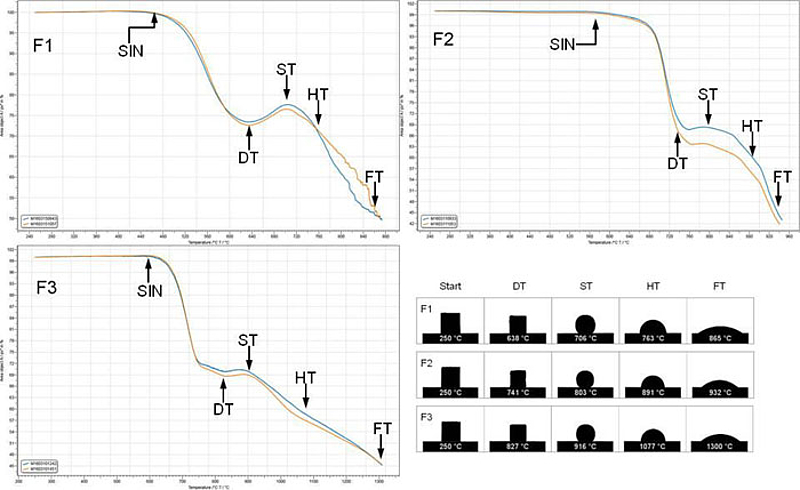
Softening and melting characteristics of frits

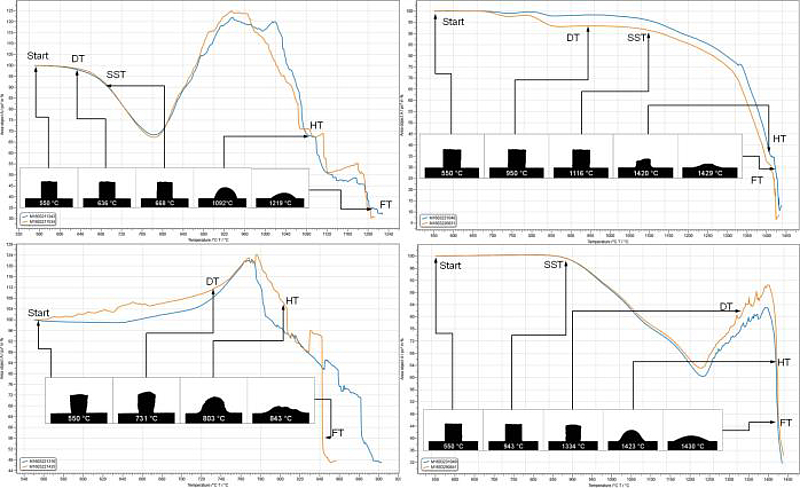
Frits are used as a starting material in different areas with a wide range of requirements, including as glazes with a protective function, as a porous filter material, or as slip or enamel. As frits generally undergo thermal treatment, it is important to know their material behaviour at relevant process temperatures.

In this report, you will find three examples of the characterisation and comparison of the melting characteristics of frits based on a coating enamel for chemical apparatus construction, a vitrified bond for grinding wheels, and a solder glass.

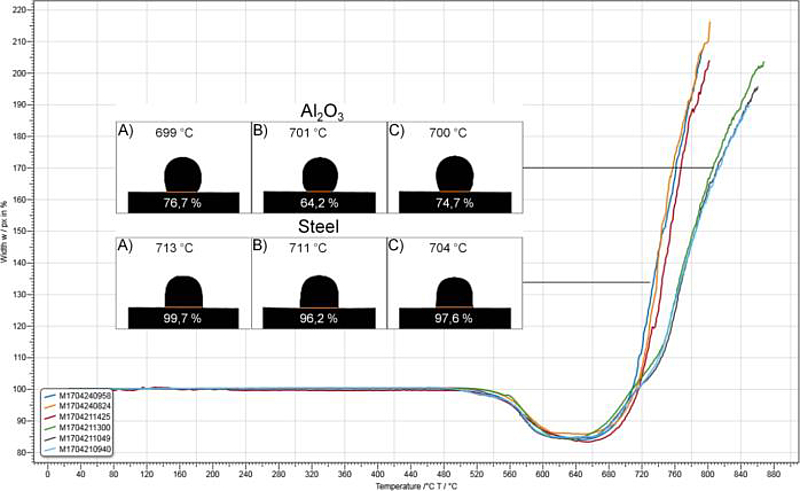
Wetting characteristics

The substrate on which the test piece is placed for measurement in the heating microscope has a direct influence on the measurement result. In standardised measurement methods for materials characterisation, the substrate should therefore always be made of the same material. At the same time, the material’s influence on the measuring result should be known.

Some materials, such as enamel, are developed directly for interaction with other materials. Heating microscope measurements can be used to draw conclusions about their reactivity or wetting characteristics.

In this report, you will find three examples of the characterisation and comparison of the wetting characteristics of frits of a vitrified bond, a coal ash, and a ground enamel on various substrates.

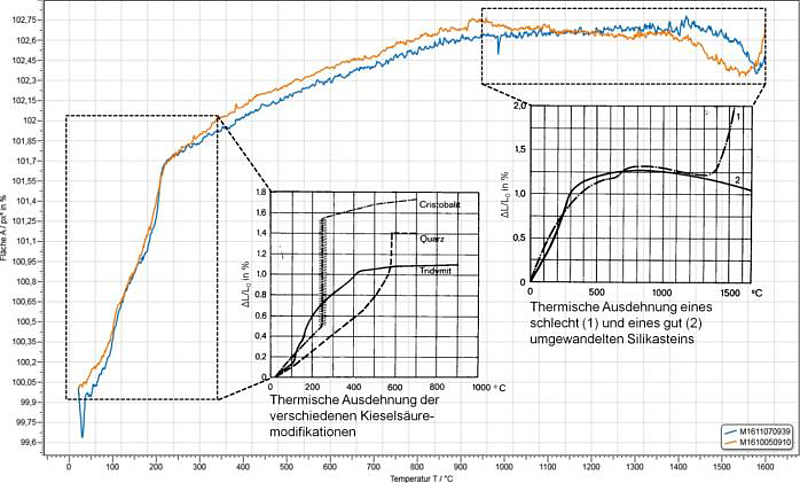
Thermal expansion characteristics and characteristic material processes

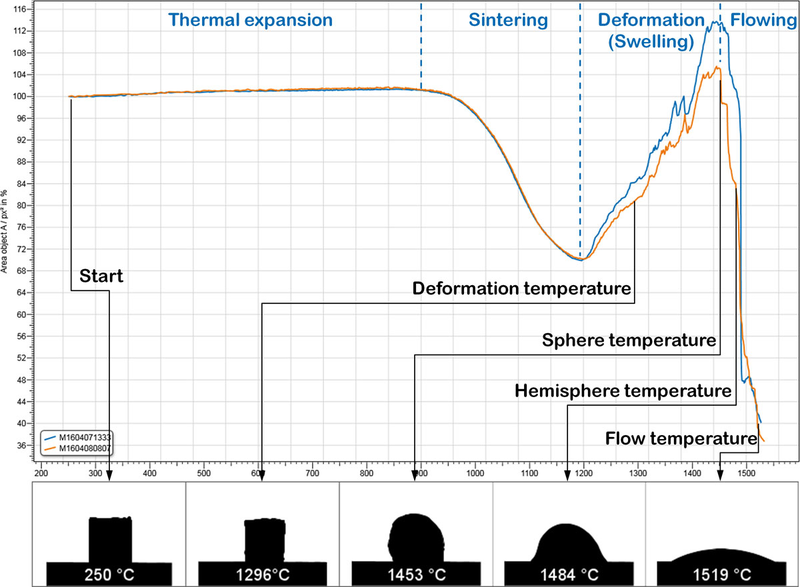
The introduction of version EM301 of the heating microscope – along with the EMI III software and newly developed evaluation algorithms – boosts the instrument’s accuracy and resolving power. This opens up new potential applications for the heating microscope in the analysis of material properties and temperature-dependent processes within materials.

In this report, you will find four examples of the determination of characteristic material properties based on an analysis of the thermal expansion characteristics of alumina, partially stabilised zirconium dioxide, silica brick, and kaolin.

Ash melting characteristics in accordance with standards

Hard coal and lignit

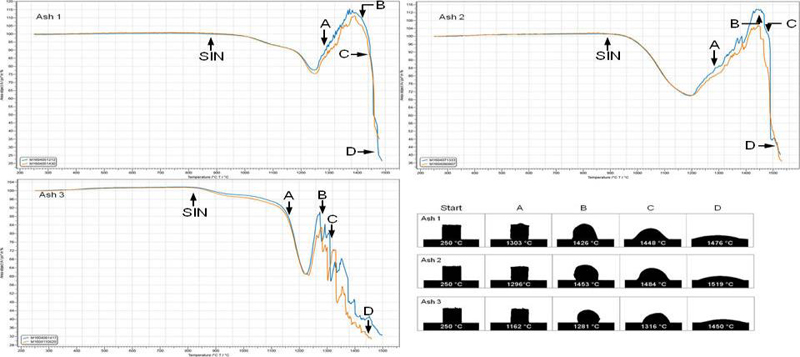
Knowledge of the behaviour of coal ashes under the influence of temperature is essential for the process control of furnace systems, among other things. When coal is burnt, non-combustible constituents are left behind as ash, which softens and melts at sufficiently high temperatures.

The behaviour during softening and melting is quantified by way of characteristic temperatures, which are defined in corresponding standards relating to the analysis of melting characteristics of ashes.

In this report, you will find three examples of the characterisation of ashes in accordance with standards based on two hard coal ashes and one lignite ash, as well as a comparison of their melting characteristics.

Solid biogenic fuels

Knowledge of the behaviour of solid biogenic fuels under the influence of temperature is essential for the process control of furnace systems, among other things. When the fuels are burnt, non-combustible constituents are left behind as ash, which softens and melts at sufficiently high temperatures.

The behaviour during softening and melting is quantified by way of characteristic temperatures, which are defined in corresponding standards relating to the analysis of melting characteristics of ashes.

In this report, you will find five examples of the characterisation of ashes of solid biogenic fuels in accordance with standards, as well as a comparison of their melting characteristics.

Accuracy

The results produced by measuring instruments such as the heating microscope are influenced by environmental conditions, measuring parameters, and the status of the instrument itself. In order to check how well the measured values correspond to the true values for a sample, calibration measurements should be carried out regularly.

Only with a calibrated system is it possible to draw unambiguous conclusions based on its measurement results. In the case of the heating microscope, the temperature measurement chain should be calibrated regularly in order to check its status and its influence on the measurement result.

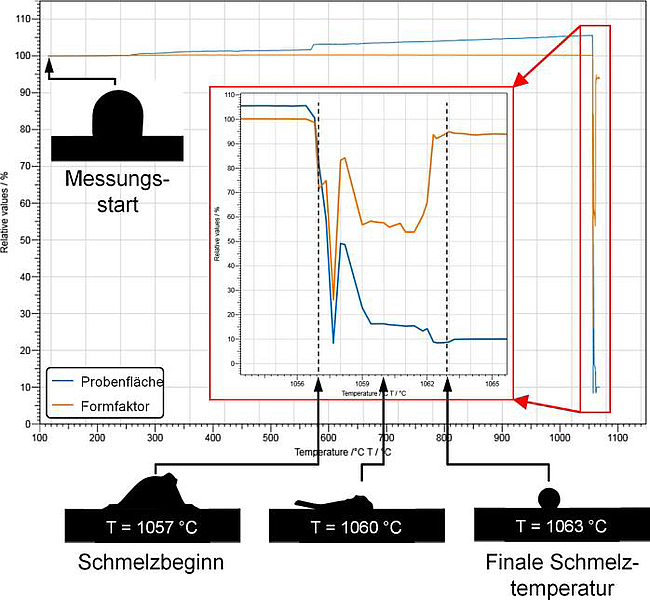
In this report, you will find three examples of the determination of the heating microscope’s accuracy based on measurements aimed at calibrating the temperature measurement chain using gold, palladium and potassium sulphate.

Repeatability

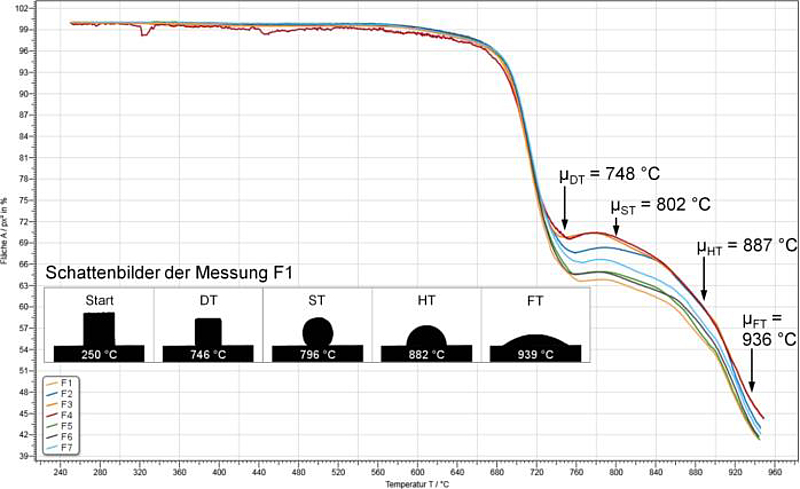
As a rule, measuring instruments are subject to error and therefore always produce results with a certain degree of uncertainty. The uncertainty affecting repeated measurements under identical conditions in the same laboratory is known as the repeatability.

In order to evaluate and interpret your own measurement result, it is essential to know the repeatability of the measuring instrument, or the measurement method, in correlation with the measured material.

In this report, you will find two examples of the determination of the repeatability of heating microscope measurement results based on measured values and characteristic temperatures for glass frit and coal ash.

Specimen type

The heating microscope was originally developed for the standardised analysis of melting characteristics of ashes in accordance with standards. This method can also be used for the characterisation of other materials.

If the heating microscope measurement is aimed not at materials characterisation but rather at analysing how a material behaves during a process, then it makes sense to adapt the specimen type to the process. For example, casting powders can be analysed in the form of granules or compressed powder charges.

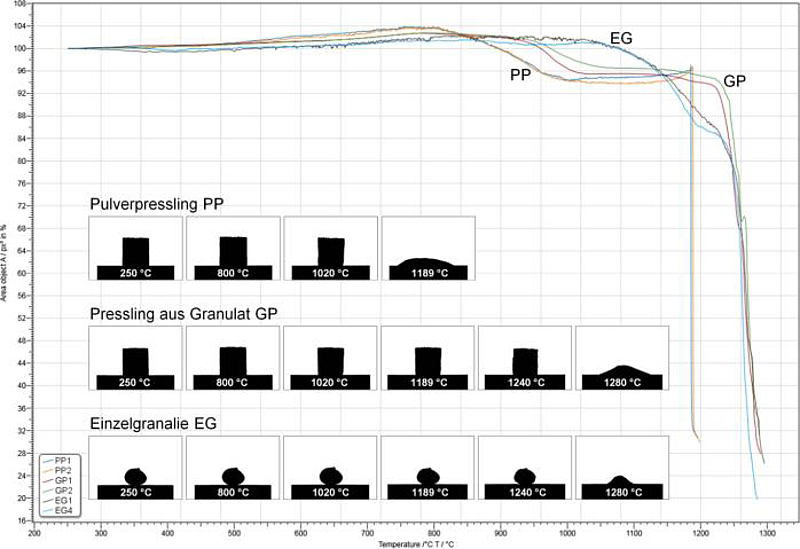
In this report, you will find an example of the analysis of the influence of the specimen type on a material’s melting characteristics based on a casting powder measured in the form of single granules, compressed powder charges, and granules pressed into pellets.

Request application reports

For all example application that we present on our website, you can request the respective application report, using the form below.

While we gladly offer you any information that we can, please understand that you cannot download our application reports directly, in order to protect the contents against misuse.


    Address


    The fields marked with * are mandatory and must be filled out. We need this to process your request. Thank you!